Silhouettes are so simple, classic, and pretty. They are a beautiful way to capture our children in these fleeting years of childhood and double as beautiful home decor. A while back I decided I was going to make my own. Now, I'm not going to say it was for Christmas last year, but I'm not going to say that it wasn't (wink, wink). Anyway, I was skeptical that I could do them myself but I was willing to try. There are countless tutorials online of how to make them yourself and I found a few different methods that seemed simple enough. In the end, here is what worked for me:
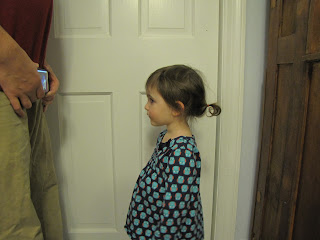
This was actually the hardest part for me! Let's just say my kids aren't asked to sit still very often and don't really see the value in it. We did manage to get two decent shots of them with a light background. Thank you Netflix!
2. Print out the photo(s).
This took some trial and error because they needed to be the exact size I wanted them in the frame. I also wanted to make sure they were somewhat accurate in relation to each other (meaning, my younger daughter's head was slightly smaller than her older sister's). I actually copied and pasted the photo into Microsoft Word and then played around with the image size % until I got it right. I'm sure there are much better ways to do this but it worked for me!
3. Draw the silhouette over the photo.
3. Draw the silhouette over the photo.
Once I had them printed out I used a black sharpie to create the exact silhouette I wanted and shaded the whole thing in. As you can see, I took a little artistic license with their eyelashes, hair detail and added some classic collars.
4. Cut them out.
Once I had them the way I wanted, I laid each one over black cardstock and used an X-acto knife to cut the shape out. This was time consuming but not particularly difficult. I surprised myself by being happy with the first drafts of both.
4. Cut them out.
Once I had them the way I wanted, I laid each one over black cardstock and used an X-acto knife to cut the shape out. This was time consuming but not particularly difficult. I surprised myself by being happy with the first drafts of both.
Here is a side by side comparison of one of the cut outs next to the original photo:

5. Frame them.
Then, just like that, a mere 11 months later they made it up on the wall in my living room! Originally, I had them in black plastic frames I ordered from Amazon. They looked nice and were matted but in the end I decided I really wanted them in old frames with some character.
I used scrapbook paper as the background and it took me a while to settle on one. I've changed it four times already but I think I'm sticking with this for a now. A lighter background does make them pop because there is more contrast but I love this pattern and it looks great with my current wall color. If I ever get bored or want to change the background it's simple to swap it out.
I'm so happy with how these turned out and that I finally got around to hanging them in our living room. I actually found them fun and rewarding to make. They will be on display in my home forever and I can imagine looking at them fondly 20 or 30 years from now and remembering what it was like to have two little girls at home.


No comments
Post a Comment